Continuing with the flask tutorial series, this article explains the use of html templates.
The first article explained how to use docker and docker-compose.
You can see the whole flask series at the following link.
This article is based on the second article of Miguel Grinberg's blog.
The project's file and directory structure is shown below:
tutorial-flask
├── app
│   ├── __init__.py
│   ├── __pycache__
│   │   ├── __init__.cpython-35.pyc
│   │   └── views.cpython-35.pyc
│   ├── templates
│   │   ├── base.html
│   │   └── index.html
│   └── views.py
├── docker-compose.yml
├── Dockerfile
├── README.md
├── run.py
└── tmp
The new files are:
base.html: The base template that will be used in the web pages.index.html: The home page, which inherits from the base.html template.views.py: This file will now handle passing information to the templates via rendering.
The other files were already explained in the previous article.
File templates/base.html:
<html>
  <head>
    {% if title %}
    <title>{{ title }} - microblog</title>
    {% else %}
    <title>microblog</title>
    {% endif %}
  </head>
  <body>
    <div>Microblog: <a href="/index">Home</a></div>
    <hr>
    {% block content %}{% endblock %}
  </body>
</html>
This template defines the page's base html code, where the title is defined if it is passed as a variable, otherwise it is placed directly in the html code. Then the blog link is placed and the content block is defined, which will be used in the index.html template.
File templates/index.html:
{% extends "base.html" %}

{% block content %}

    <h1>Hola, {{ usuario.nickname }}!</h1>

    {% for post in posts %}

    <p>

      {{ post.autor.nickname }} dice: <b>{{ post.cuerpo }}</b>

    </p>

    {% endfor %}

{% endblock %}
The first thing it does is extend the features that base.html handles, then the content block is shown, where an h1 is defined, followed by the microblog posts.
Now it is the turn of the views.py file:
#Se importa render_template para renderizar plantillas html

from flask import render_template

#Se importa la aplicacion

from app import app


#Se define la ruta del url raiz e index

@app.route('/')

@app.route('/index')

def index():

    #Se define el nombre del usuario

    usuario = {'nickname': 'Ernesto'}

    #Se define los posts del blog

    posts = [

        {

            'autor': {'nickname': 'John Doe'},

            'cuerpo': 'Un dia en Edimburgo'

        },

        {

            'autor': {'nickname': 'Jane Doe'},

            'cuerpo': 'Muy buena Civil war!'

        }

    ]

    #Se devuelve index.html con el titulo, usuario y posts

    return render_template("index.html",

                           title='Home',

                           usuario=usuario,

                           posts=posts)
Dictionaries are used to pass the data to the templates when returning the rendered template with the web page (index.html, the page title, the user and the posts).
All that remains is to build the docker image and bring up the application using docker-compose:
docker-compose  build
Building web
Step 1 : FROM python
 ---> 7fd24fb1b492
Step 2 : WORKDIR /code
 ---> Using cache
 ---> bdc41d9c0a55
Step 3 : RUN pip install --upgrade pip
 ---> Using cache
 ---> a2f64276e289
Step 4 : RUN pip install  flask
 ---> Using cache
 ---> 56d3d1077646
Step 5 : RUN pip install  flask-login
 ---> Using cache
 ---> ebe8bc959ad8
Step 6 : RUN pip install  flask-openid
 ---> Using cache
 ---> fe54237ce068
Step 7 : RUN pip install  flask-mail
 ---> Using cache
 ---> f1594ad12f2b
Step 8 : RUN pip install  flask-sqlalchemy
 ---> Using cache
 ---> 6d04889555c2
Step 9 : RUN pip install  sqlalchemy-migrate
 ---> Using cache
 ---> d25cd2a54289
Step 10 : RUN pip install  flask-whooshalchemy
 ---> Using cache
 ---> 4479491e59aa
Step 11 : RUN pip install  flask-wtf
 ---> Using cache
 ---> 170b10c7dea0
Step 12 : RUN pip install  flask-babel
 ---> Using cache
 ---> fe581f26a1e5
Step 13 : RUN pip install  guess_language
 ---> Using cache
 ---> 6d2d290ed6d3
Step 14 : RUN pip install  flipflop
 ---> Using cache
 ---> 35e2dff248ce
Step 15 : RUN pip install  coverage
 ---> Using cache
 ---> 7012043af8e9
Step 16 : RUN pip install  redis
 ---> Using cache
 ---> ce2854de687f
Step 17 : EXPOSE 5000
 ---> Using cache
 ---> f947cd2c0d69
Step 18 : ADD . /code
 ---> Using cache
 ---> 3cc197931bf8
Step 19 : CMD python run.py
 ---> Using cache
 ---> 7154441c088c
Successfully built 7154441c088c
The image must be rebuilt so that it picks up the volume defined in docker-compose.yml.
Now bring up the application:
docker-compose up
Creating tutorialflask_web_1
Attaching to tutorialflask_web_1
web_1  |  * Running on http://0.0.0.0:5000/ (Press CTRL+C to quit)
web_1  |  * Restarting with stat
web_1  |  * Debugger is active!
web_1  |  * Debugger pin code: 309-259-945
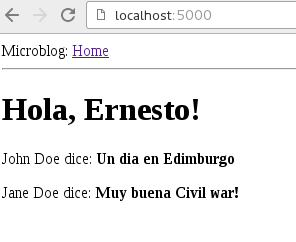
Opening the browser at http://localhost:5000 gives what the following image shows:
To stop the application use docker-compose down:
docker-compose down
Stopping tutorialflask_web_1 ... done
Removing tutorialflask_web_1 ... done
You can see the code of this article on the articulo2 branch articulo2 of the gitlab repository.
Make a donation! If you liked the article you can make a donation with Bitcoin (BTC) using the digital wallet of your choice to the following address: 17MtNybhdkA9GV3UNS6BTwPcuhjXoPrSzV
Or by scanning the QR code from your wallet: