This article is the continuation of the previous article Creating JSON data from a dictionary in Flask (part 1) (update - Docker).
This article is based on the article in English: Working with JSON in Python Flask (broken link).
You can download the source code of this article from the json2 branch on gitlab.
You can see the other articles about Flask at the Flask tag link.
Dockerfile and docker-compose.yml files
The installation of the names library is added to the Dockerfile; it makes it easy to handle random first and last names for use in the client application app.py in the Empleado class.
The complete code of the Dockerfile is the following:
FROM python

WORKDIR /code

RUN pip3 install --upgrade pip


RUN pip3 install  flask


RUN pip3 install names

EXPOSE 5000


ADD . /code


CMD python app.py
The docker-compose.yml file has the following:
tutorial-json2:

  build: .

  ports:

   - "5000:5000"

  volumes:

   - .:/code
Empleado class
For this article a module called empleado.py is created with an Empleado class, which stores the employee's first and last name in __init__, and then a method is created that builds a json from a dictionary:
def toJSON(self):

        return {"Empleado": {'nombre': self.nombre,

                 'apellido': self.apellido}}
The complete code of empleado.py is shown below:
#!/usr/bin/env python


"""Se cra la insancia Empleado

Se crea el constructor donde se le pasa el nombre y apellido

"""


class Empleado:

    def __init__(self,nombre,apellido):

        self.nombre = nombre

        self.apellido = apellido


    def toJSON(self):

        return {"Empleado": {'nombre': self.nombre,

                 'apellido': self.apellido}}
The app.py application
Here the names module is used, which generates random first and last names, and the Empleado class is used to store the data:
#!/usr/bin/env python

#Se importa de flask a Flask, jsonify y json

from flask import Flask,jsonify,json

#Se importa empleados import Empleado

from empleado import Empleado

#Se importa names

import names

#Se importa sys

import sys


#Se crea la instancia de la aplicacion

app = Flask(__name__)


#Se crea

#Se define el decorador route donde se da la ruta del servidor web.

@app.route("/ListaEmpleados")

def ListaEmpleados():

    try:

        #inicializar la lista de empleados

        listaEmpleados = []

        #crear instancias para llenar la lista

        for i in range(0,5):

            empleado = Empleado(names.get_first_name(),names.get_last_name())

            listaEmpleados.append(empleado)


        # convertir en dato json al diccionario

        jsonStr = json.dumps([e.toJSON() for e in listaEmpleados])

    except :

        print ("error", sys.exc_info()[0])


    #Retorna el json

    return jsonStr


if __name__ == '__main__':

    app.run(host="0.0.0.0",debug=True)
Running the application
To run the application, run docker-compose:
docker-compose build
docker-compose up
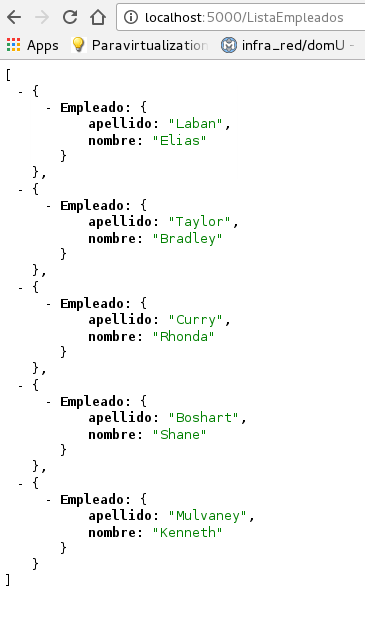
Opening the url (http://localhost:5000/ListaEmpleados ) shows the list of employees with their first and last names (random first and last names).
A screenshot of the browser is shown below:
Finally, the application output is shown:
Recreating tutorialflask_tutorial-json1_1
Attaching to tutorialflask_tutorial-json1_1
tutorial-json1_1 |  * Running on http://0.0.0.0:5000/ (Press CTRL+C to quit)
tutorial-json1_1 |  * Restarting with stat
tutorial-json1_1 |  * Debugger is active!
tutorial-json1_1 |  * Debugger pin code: 733-227-386
tutorial-json1_1 | 172.17.0.1 - - [25/Sep/2016 20:34:42] "GET /ListaEmpleados HTTP/1.1" 200 -
Make a donation! If you liked the article you can make a donation with Bitcoin (BTC) using the digital wallet of your choice to the following address: 17MtNybhdkA9GV3UNS6BTwPcuhjXoPrSzV
Or by scanning the QR code from the wallet: